
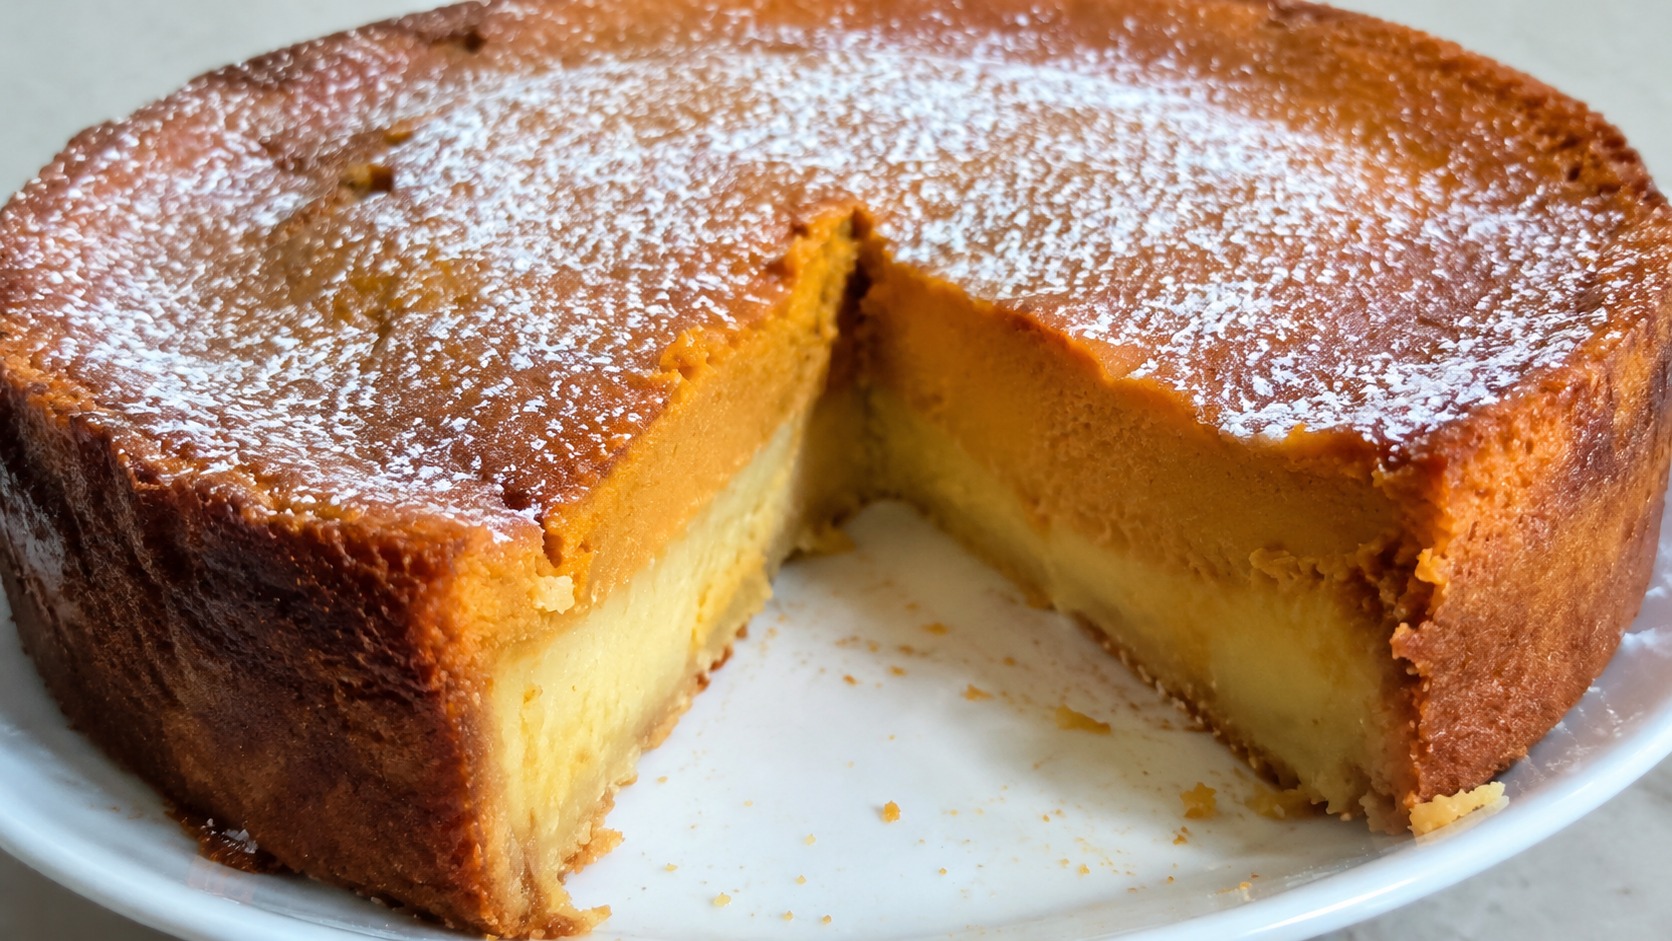
There is something almost unbelievable about a dessert that starts as one simple batter and finishes as three distinct layers, a dense fudgy base, a soft custard middle, and a light sponge top. That is exactly what happens with Pumpkin Pie Magic Cake, a one bowl treat that combines the warm spice of classic pumpkin pie with the effortless charm of a magic cake. You pour a single mixture into the pan, bake it low and slow, and the oven does the rest of the work by separating the batter into layers as it sets. No stacking, no fussy assembly, just autumn flavor in every forkful.
This dessert has become a favorite for home bakers who want the taste of holiday pie without rolling out a crust. It is forgiving, budget friendly, and made almost entirely from pantry staples. Below you will find the science behind why it works, a full ingredient list, step by step directions, tips for getting the layers just right, storage advice, and answers to the questions people ask most often about this recipe.
Key Takeaways
- A single thin batter separates into three layers (custard, sponge, and a dense base) purely through baking science, no layering by hand required.
- The recipe leans on eggs, milk, sugar, butter, flour, canned pumpkin, and warm spices like cinnamon, nutmeg, and ginger.
- Low oven temperature and a long bake time are essential; rushing the process with high heat will prevent the layers from forming properly.
- It can be made a day ahead, which actually improves the texture and makes slicing easier.
- The dessert works as a lighter, crustless alternative to traditional pie for Thanksgiving or any fall gathering.
What Makes This Cake “Magic”
The term “magic cake” comes from a French baking trend where a runny, egg heavy batter bakes into layers of differing density without any manual separation. The bottom layer becomes custard like because it sits closest to the heat and sets slowly. The middle firms into a soft, pudding style texture. The top rises into a delicate sponge as air bubbles escape upward during baking. Adding pumpkin puree and pie spices to this base turns an already clever technique into something that tastes unmistakably like autumn.
The reason this works comes down to flour ratio and liquid content. A traditional cake batter has enough flour and leavening to stay uniform throughout baking. This batter, by contrast, uses very little flour relative to the amount of milk and eggs, which keeps it thin enough to separate as heat moves through the pan gradually.
Ingredients You Will Need
Most of what goes into this dessert is already sitting in a typical kitchen during pumpkin season.
- 4 large eggs, separated
- 3/4 cup granulated sugar, divided
- 1/2 cup unsalted butter, melted and slightly cooled
- 1 cup pumpkin puree (not pumpkin pie filling)
- 2 cups whole milk, warmed slightly
- 1 teaspoon vanilla extract
- 3/4 cup all purpose flour
- 1 1/2 teaspoons ground cinnamon
- 1/2 teaspoon ground ginger
- 1/4 teaspoon ground cloves
- 1/4 teaspoon ground nutmeg
- 1/4 teaspoon salt
- Powdered sugar, for dusting
Separating the eggs matters here. The whites get whipped separately and folded in at the end, which is what allows that top spongy layer to form.
Step by Step Instructions
1. Prepare the pan and oven. Preheat the oven to 325°F (163°C), which is lower than most cake recipes call for. Grease an 8×8 inch baking dish and line it with parchment paper, leaving overhang on two sides for easy removal later.
2. Whip the egg whites. In a clean bowl, beat the egg whites until soft peaks form. Slowly add 1/4 cup of the sugar while continuing to beat until the peaks turn glossy and hold their shape. Set this aside.
3. Mix the yolks and sugar. In a separate large bowl, whisk the egg yolks with the remaining 1/2 cup of sugar until the mixture turns pale and slightly thickened. Add the melted butter and whisk to combine.
4. Add pumpkin and spices. Stir in the pumpkin puree, vanilla extract, cinnamon, ginger, cloves, nutmeg, and salt. Mix until smooth and evenly colored.
5. Incorporate the flour. Sift the flour into the pumpkin mixture and whisk gently until no lumps remain. The batter will still be quite thin at this stage, which is expected.
6. Warm the milk. Gently warm the milk on the stove or in the microwave until it is lukewarm, not hot. Slowly pour it into the pumpkin batter while whisking continuously.
7. Fold in the egg whites. Add the whipped egg whites in three additions, folding gently with a spatula each time. The batter will look thin and slightly streaky with foam floating on top. That is normal and is actually a sign the layers will form correctly.
8. Bake low and slow. Pour the batter into the prepared pan and bake for 50 to 60 minutes. The top should look set and lightly golden, while the center should still have a gentle jiggle, similar to a baked custard.
9. Cool completely before slicing. Let the cake cool at room temperature for at least an hour, then refrigerate for two to three hours or overnight. Cutting into it too soon will blur the layers.
10. Dust and serve. Once chilled and sliced, dust the top with powdered sugar just before serving for a clean, bakery style finish.
Tips for Getting Distinct Layers
Achieving three clean layers depends on a few small details that are easy to overlook.
- Do not overmix once the egg whites go in. Folding too aggressively knocks out the air that helps create the top sponge layer.
- Use room temperature eggs. Cold eggs do not whip to the same volume, which affects how well the layers separate.
- Warm milk gently. Milk that is too hot can start cooking the eggs prematurely, while cold milk slows the batter’s ability to separate.
- Resist opening the oven door early. A sudden temperature drop can cause the layers to collapse into each other before they set.
- Let it fully chill. The layers are visible right out of the oven, but they firm up and become much easier to slice cleanly after refrigeration.
Storage and Make Ahead Advice
This dessert actually improves with a rest in the refrigerator, making it an excellent make ahead option for holiday planning. Store leftovers covered in the refrigerator for up to four days. The texture stays creamy, and the spice flavor tends to deepen slightly by the second day.
Freezing is possible but not ideal, since the custard layer can turn watery once thawed. If freezing is necessary, wrap individual slices tightly in plastic wrap and foil, then thaw them slowly in the refrigerator rather than at room temperature.
Variations Worth Trying
Once the base technique is mastered, there is plenty of room to experiment. A splash of bourbon or dark rum added to the batter brings warmth without overpowering the pumpkin flavor. Swapping half the milk for coconut milk adds a subtle richness that pairs nicely with the spices. For a stronger caramel note, browning the butter before adding it to the yolk mixture adds depth without any extra ingredients. Some bakers also add a thin layer of crushed graham crackers to the bottom of the pan before pouring in the batter, which mimics the crust of a traditional pie.
FAQ Section
Does this taste like actual pumpkin pie? Yes, the spice blend and pumpkin puree give it a flavor very close to classic pie filling. The texture is different, since the layers add contrast between creamy custard and light sponge, but the taste profile will feel familiar to anyone who loves pumpkin pie.
Why did my cake not separate into layers? This usually happens when the oven temperature is too high, the batter is overmixed after folding in the egg whites, or the milk was too hot when added. Double check your oven with a thermometer, since many home ovens run hotter than their dial suggests.
Can I use pumpkin pie spice instead of individual spices? Yes, substitute about 2 teaspoons of pumpkin pie spice for the cinnamon, ginger, cloves, and nutmeg listed in the recipe. The flavor will be nearly identical.
Is it normal for the batter to look separated before baking? Yes, a slightly streaky, foamy appearance with liquid batter underneath is exactly what you want to see. It signals the ingredients are positioned correctly to form distinct layers as they bake.
Can this be made gluten free? A one to one gluten free flour blend can generally be substituted with good results, though the sponge layer may end up slightly denser than the original version.
How do I know when it’s fully baked? The top should look set and slightly golden, and a gentle jiggle in the center is expected, similar to how a cheesecake or custard pie looks when it comes out of the oven. It will firm up fully as it cools.
There is a reason this dessert keeps showing up on fall dessert lists year after year. It takes the comforting flavor everyone already loves and turns it into something visually striking without demanding advanced baking skills. Whip, pour, bake low and slow, then let patience do the final bit of work in the refrigerator. Slice it thin, dust it with powdered sugar, and serve it alongside coffee or spiced cider for a dessert that feels both nostalgic and a little bit magical, proof that sometimes the simplest recipes leave the biggest impression at the table.