
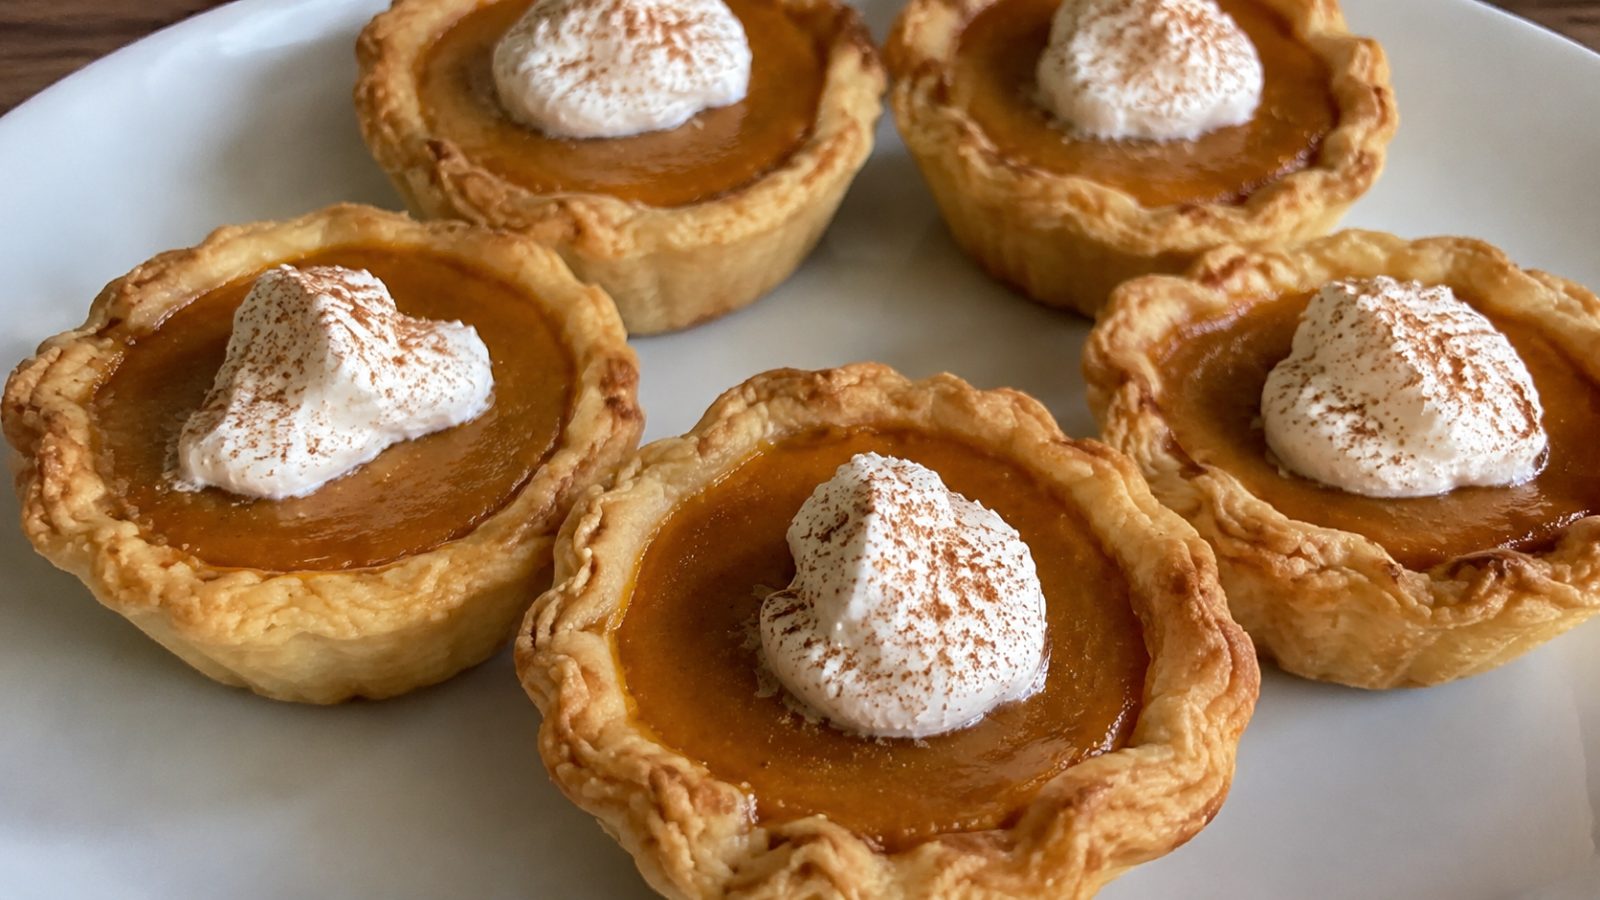
Thanksgiving dessert tables tend to fill up fast, and the classic nine-inch pumpkin pie often ends up half eaten, awkwardly sliced, and hard to serve. If you want a sweeter solution, you are in the right place. These easy mini pumpkin pies for Thanksgiving give every guest their own perfectly portioned treat, with a flaky golden crust and a silky, spiced filling that tastes like autumn in every bite.
Mini pies bake faster than full-size ones, they travel well, and they look adorable on a dessert platter. They also take the pressure off the host, because there is no slicing, no collapsing wedges, and no arguments over who gets the biggest piece. Whether you are baking for a crowd of twenty or a quiet dinner for four, this recipe scales beautifully and works with both homemade and store-bought crust.
Key Takeaways
- Mini pumpkin pies bake in about 25 to 30 minutes, much faster than a full-size pie.
- A muffin tin is all you need, so no special equipment is required.
- You can use homemade or store-bought crust and canned or fresh pumpkin puree.
- The pies can be made up to three days ahead and stored in the refrigerator.
- Each batch yields 12 to 14 pies, making them ideal for feeding a crowd.
Why Mini Pies Beat the Full-Size Version
A traditional pumpkin pie has a few well-known problems. The center can stay underbaked while the edges overcook, the crust can turn soggy, and cutting clean slices takes practice. Mini pies solve nearly all of these issues at once.
Because each pie is small, the filling sets evenly and quickly. The crust gets proper contact with the heat of the muffin tin, so the bottom stays crisp instead of soggy. Portion control becomes simple as well, which is a real bonus on a holiday when guests are already full of turkey, stuffing, and mashed potatoes. Many people say they cannot manage a whole slice of pie after dinner but happily eat a mini one.
There is also the visual appeal. A tray of little pies topped with whipped cream and a dusting of cinnamon looks polished and festive without any extra decorating skill.
Ingredients You Will Need
For the Crust
- 2 refrigerated pie crusts (or one batch of your favorite homemade dough)
- 1 tablespoon all-purpose flour for dusting the counter
- 1 egg, beaten, for brushing the edges (optional)
For the Pumpkin Filling
- 1 can (15 ounces) pumpkin puree, not pumpkin pie filling
- 3/4 cup granulated sugar
- 1/2 cup heavy cream or evaporated milk
- 2 large eggs
- 1 teaspoon ground cinnamon
- 1/2 teaspoon ground ginger
- 1/4 teaspoon ground nutmeg
- 1/8 teaspoon ground cloves
- 1/2 teaspoon salt
- 1 teaspoon pure vanilla extract
For Serving
- Whipped cream
- Ground cinnamon or pumpkin pie spice
- Crushed pecans or caramel drizzle (optional)
Equipment Checklist
You only need a few basic tools for this recipe. A standard 12-cup muffin tin is the star of the show. You will also need a round cutter or an upside-down glass about four inches wide, a rolling pin, a large mixing bowl, a whisk, and a ladle or measuring cup for pouring the filling. A small cookie scoop can make filling the cups cleaner and faster.
Step-by-Step Instructions
Step 1: Prepare Your Oven and Pan
Preheat your oven to 375°F (190°C) and position the rack in the center. Lightly grease the muffin tin with nonstick spray or a thin coating of butter. Even if your pan is nonstick, a little grease helps the pies release without tearing the crust.
Step 2: Cut and Shape the Crust
Unroll the pie crusts on a lightly floured surface. If you are using homemade dough, roll it out to about an eighth of an inch thick. Use your cutter or glass to cut out circles roughly four inches wide. Gather the scraps, reroll them once, and cut more circles until you have 12 to 14.
Gently press each circle into a muffin cup, pushing the dough into the bottom and up the sides. Let the edges rise slightly above the rim, then crimp them with your fingers or the tines of a fork for a decorative look. Place the pan in the refrigerator for ten minutes while you mix the filling. Cold dough holds its shape better in the oven.
Step 3: Mix the Filling
In a large bowl, whisk together the pumpkin puree and sugar until smooth. Add the eggs one at a time, whisking well after each. Pour in the cream and vanilla, then stir in the cinnamon, ginger, nutmeg, cloves, and salt. Whisk until the mixture is uniform with no streaks of spice.
For an extra silky texture, pour the filling through a fine mesh strainer. This removes any tiny lumps and gives you a smoother finished pie.
Step 4: Fill the Crusts
Remove the muffin tin from the refrigerator. Spoon or ladle the filling into each crust, filling them about three quarters full. The filling puffs slightly as it bakes, so avoid going to the very top. If you want a golden shine, brush the exposed crust edges with beaten egg.
Step 5: Bake Until Set
Bake for 25 to 30 minutes. The pies are done when the filling is set around the edges and has only a slight wobble in the very center. A toothpick inserted near the middle should come out mostly clean. If the crust edges brown too quickly, loosely tent the pan with foil for the last ten minutes.
Step 6: Cool Completely
Let the pies cool in the pan on a wire rack for 15 minutes, then run a thin knife around each edge and carefully lift them out. Transfer them to the rack and cool for another 30 minutes. Cooling fully is important because the filling continues to firm up as it comes to room temperature.
Step 7: Top and Serve
Add a swirl of whipped cream, a pinch of cinnamon, and any extra toppings you like. Serve at room temperature or chilled.
Tips for Perfect Mini Pumpkin Pies
Pumpkin puree holds a lot of moisture, and that moisture is the main cause of soggy crusts. To reduce it, blot the puree with a paper towel before measuring, or spread it on a plate and let it sit for a few minutes. This small step improves both texture and flavor concentration.
Blind baking the crusts for five to seven minutes before filling can also help if you love an extra crisp base. Press a small piece of parchment into each cup, add a few pie weights or dried beans, bake, then remove the weights and proceed with the filling.
Do not overbake. Pumpkin custard is delicate, and baking until it is completely firm in the center leads to cracks and a rubbery texture. Pull the pies out while the middle still has a gentle jiggle, and residual heat will finish the job.
Finally, use fresh spices. Ground spices lose their punch after about a year, and the difference in flavor is noticeable. If your cinnamon smells faint, it is time to replace it.
Creative Variations to Try
Gingersnap Crust Minis
Skip the dough and press a mixture of crushed gingersnap cookies and melted butter into the muffin cups. Bake the crusts for eight minutes, fill, and bake as directed. The spicy cookie base pairs wonderfully with the creamy pumpkin.
Maple Pecan Topping
Stir two tablespoons of pure maple syrup into the filling and top each pie with a toasted pecan half before baking. The result is a cozy blend of pumpkin and maple that feels extra festive.
Cream Cheese Swirl
Beat four ounces of softened cream cheese with two tablespoons of sugar. Drop a small spoonful onto each filled pie and swirl it with a toothpick for a marbled look and a tangy finish.
Chocolate Drizzle
Melt a handful of dark chocolate chips and drizzle them over the cooled pies. Chocolate and pumpkin are a surprisingly lovely match, and the drizzle makes the platter look bakery quality.
Dairy-Free Option
Swap the cream for full-fat canned coconut milk and use a dairy-free pie crust. The coconut adds a gentle richness, and most guests will never guess the change.
Make-Ahead and Storage Guide
One of the best features of this recipe is how well it fits into a busy holiday schedule. You can bake the pies up to three days in advance. Let them cool completely, then store them in a single layer in an airtight container in the refrigerator. Keep the whipped cream and toppings separate until you are ready to serve so the crust stays crisp.
To freeze, place the cooled, unadorned pies on a baking sheet and freeze until solid, about two hours. Transfer them to a freezer-safe bag or container with parchment between layers. They keep for up to two months. Thaw overnight in the refrigerator and bring to room temperature before topping.
Serving Ideas for a Beautiful Dessert Table
Presentation turns a simple dessert into a showpiece. Arrange the pies on a tiered stand or a wooden board and scatter a few cinnamon sticks, small pumpkins, or autumn leaves around them. Offer a toppings bar with bowls of whipped cream, caramel sauce, chopped pecans, toasted coconut, and crushed gingersnaps so guests can customize their own.
Pair the pies with hot coffee, spiced tea, or warm apple cider. For a lighter finish, serve them alongside a bowl of fresh cranberries or sliced pears to balance the richness.
If you are hosting children, let them help decorate. Giving kids a spoonful of whipped cream and a sprinkle of cinnamon makes them feel included and keeps them busy while you finish the rest of the meal.
Common Mistakes to Avoid
Using pumpkin pie filling instead of pumpkin puree is the most common error. Pie filling is pre-sweetened and spiced, so using it in this recipe makes the pies far too sweet and throws off the balance.
Overfilling the cups is another pitfall. The filling expands and can spill over the edges, making the pies stick to the pan. Stick to three quarters full.
Skipping the chilling step for the shaped crusts can cause shrinkage and uneven edges. Ten minutes in the refrigerator makes a real difference.
Finally, do not rush the cooling. Cutting into or removing warm pies can lead to broken crusts and soft centers. Patience gives you clean, sturdy minis.
Nutrition Notes
Each mini pie contains roughly 180 to 220 calories, depending on the crust and toppings you choose. Pumpkin itself is rich in fiber and vitamin A, which makes this dessert a little more nourishing than many holiday sweets. To lighten things up, reduce the sugar by two tablespoons, use evaporated skim milk in place of cream, and top with a small dollop of Greek yogurt instead of whipped cream.
Frequently Asked Questions
Can I use fresh pumpkin instead of canned puree?
Yes. Roast a sugar pumpkin until tender, scoop out the flesh, and blend it until smooth. Fresh puree is often wetter than canned, so drain it in a fine strainer for about 20 minutes before measuring.
How do I keep the crust from getting soggy?
Chill the shaped dough before filling, blot excess moisture from the puree, and consider blind baking the crusts for a few minutes. Storing the pies without toppings also helps the crust stay crisp.
Can I bake these in a mini muffin tin?
Absolutely. Cut smaller dough circles, about three inches wide, and reduce the baking time to 15 to 18 minutes. You will get around 24 bite-size pies, which are perfect for a party platter.
How do I know when the pies are done?
Look for set edges and a center that wobbles slightly when the pan is nudged. A toothpick near the middle should come out mostly clean. The pies will firm up fully as they cool.
Can I make the pies gluten-free?
Yes. Use a gluten-free pie crust or a crushed gluten-free cookie base, and check that your spices and vanilla are labeled gluten-free. The filling itself contains no wheat.
How long do the pies stay fresh?
Stored in an airtight container in the refrigerator, they stay fresh for up to four days. For longer storage, freeze them without toppings for up to two months.
Baking a tray of these little pies is one of the simplest ways to make your holiday table feel special. They are quick to prepare, forgiving for beginners, and endlessly customizable, and they free you from the stress of slicing and serving at the last minute. With flaky crust, creamy spiced filling, and a cloud of whipped cream on top, they will disappear faster than anything else on the table. Try this recipe for easy mini pumpkin pies for Thanksgiving this year, and you may find it becomes a tradition your family asks for every November.